Today We Learn About How To make A 12 Volt Diy DC Motor From Scratch Full Prosses Using Iron Plate, wire no 28 and magnet Step by step
1- First of All we will cut a round or circle shaped piece of an metal like iron Shown below
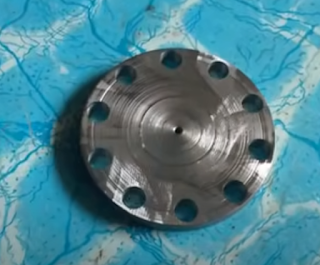
2- Now we will clean it and make drill holes in this plate or iron and after this it will look like the below image
3-Now we will Cut a small part from every hole for passing wire like shown in below image
4-Now we have to use a shaft like shown in below image
5-Now we have to fic this shaft in the center then this will look cool like shown in below image
6- This will be a break time because I am tired (hahahahahahha) just a joke now back to work we will select a wire of 28 number for winding and wind 70 rounds each like the below image
7-Now after 70 rounds of wire then give a round to shaft like the below image
8- Do This for all at end final results are shown below
9- You need meganets like shown below
10- Fix the motor like shown below
11- Final step is to connect wires and run the motor
SO THIS IS THE FINAL RESULTS THANKS FOR WATCHING AND FOR FULL VIDEO VISIT OUR YOUTUBE CHANNEL OR WATCH BELOW
We Build The Lever Engine 10 KW Free Energy Self Running Machine Diy Spring Free Electricity
Introduction to Lever Engine 10 KW Free Energy Self Running Machine
The Lever Engine 10 KW Free Energy Self Running Machine is a revolutionary invention that has the potential to change the way we perceive and use energy. This machine, which harnesses the power of springs and levers, is capable of generating 10 KW of free energy, making it a game-changer in the energy sector.
The Science Behind the Lever Engine
The Lever Engine operates on the principle of mechanical advantage, which is the ratio of output force to input force in a system. By using levers and springs, the machine can amplify a small input force into a large output force, thereby generating a significant amount of energy.
Components of the Lever Engine
The Lever Engine is composed of several key components, including a lever arm, a spring, a flywheel, and a generator. Each of these components plays a crucial role in the operation of the machine.
Building the Lever Engine 10 KW Free Energy Self Running Machine
Building the Lever Engine 10 KW Free Energy Self Running Machine is a complex but rewarding process. It requires a deep understanding of mechanical principles, as well as a high level of precision and attention to detail.
Step-by-Step Guide to Building the Lever Engine
This section provides a detailed, step-by-step guide to building the Lever Engine. It covers everything from the initial design and planning stages to the final assembly and testing of the machine.
Safety Precautions When Building the Lever Engine
Safety is paramount when building the Lever Engine. This section outlines the necessary safety precautions to take during the building process, including the use of protective equipment and the proper handling of tools and materials.
The Potential of the Lever Engine 10 KW Free Energy Self Running Machine
The Lever Engine 10 KW Free Energy Self Running Machine has enormous potential. It could revolutionize the energy sector, reduce our reliance on fossil fuels, and contribute to a more sustainable future.
The Lever Engine and Sustainability
The Lever Engine is a sustainable energy solution. It generates free energy without producing harmful emissions, making it an environmentally friendly alternative to traditional energy sources.
The Future of the Lever Engine
The future of the Lever Engine is bright. With continued research and development, this machine could become a common fixture in homes and businesses, providing a reliable and sustainable source of energy.
Conclusion
The Lever Engine 10 KW Free Energy Self Running Machine is a groundbreaking invention that could transform the energy sector. By harnessing the power of levers and springs, this machine generates a significant amount of free energy, offering a sustainable and environmentally friendly alternative to traditional energy sources. With its potential to revolutionize the way we use and perceive energy, the Lever Engine is undoubtedly a game-changer.
FAQs
Q1: What is the Lever Engine 10 KW Free Energy Self Running Machine?
Q2: How does the Lever Engine generate free energy?
Q3: What are the key components of the Lever Engine?
Q4: How can I build my own Lever Engine?
Q5: What is the potential impact of the Lever Engine on the energy sector?
How To Make Free Energy Self Running Machine Lever Engine With 6 Levers Diy Experiment Full Process
Introduction to Free Energy Self Running Machines
Harnessing the power of free energy is a concept that has intrigued scientists and inventors for centuries. The idea of creating a self-running machine, a perpetual motion device, is a fascinating prospect. This article will guide you through the process of creating a lever engine with six levers, a DIY experiment that could potentially generate free energy.
Understanding the Concept of Free Energy
Free energy, also known as zero-point energy, is a form of energy that is present in all space and can theoretically be harnessed to produce power. The concept of free energy is rooted in the laws of thermodynamics and quantum mechanics, making it a complex yet intriguing subject.
The Role of Levers in Energy Generation
Levers are simple machines that can amplify an input force to provide a greater output force. In the context of a self-running machine, levers can be used to create a mechanical advantage, potentially leading to the generation of free energy.
Step-by-Step Guide to Building a Self Running Machine Lever Engine
Creating a self-running machine lever engine is a complex task that requires precision, patience, and a deep understanding of mechanical principles. Here is a step-by-step guide to help you through the process.
Gathering the Necessary Materials
The first step in any DIY project is gathering the necessary materials. For this project, you will need six levers, a sturdy base, bearings, rods, and a variety of tools including a drill, screws, and a saw.
Assembling the Levers
The assembly of the levers is a critical step in the process. Each lever must be carefully attached to the base using the bearings and rods, ensuring that they can move freely and efficiently.
Testing the Machine
Once the levers have been assembled, it's time to test the machine. This step involves applying force to the levers and observing the resulting motion. If the machine is functioning correctly, the levers should move in a continuous cycle, potentially generating free energy.
The Science Behind Free Energy Self Running Machines
Understanding the science behind free energy self running machines is crucial to successfully building and operating one. This section will delve into the principles of physics and engineering that underpin these machines.
The Laws of Thermodynamics and Free Energy
The laws of thermodynamics are fundamental to the concept of free energy. These laws govern the transfer of energy within a system and are crucial to understanding how a self-running machine could potentially generate free energy.
The Role of Quantum Mechanics in Free Energy Generation
Quantum mechanics, the branch of physics that deals with the behavior of particles at the atomic and subatomic level, also plays a role in the concept of free energy. Quantum fluctuations, for example, are thought to be a potential source of free energy.
Conclusion
Creating a free energy self running machine lever engine is a complex task that requires a deep understanding of physics and engineering principles. However, with patience, precision, and the right materials, it is possible to build a machine that could potentially harness the power of free energy. This DIY experiment is not only a fascinating project but also a glimpse into the future of energy generation.
Frequently Asked Questions
What is a self-running machine?
A self-running machine, also known as a perpetual motion machine, is a device that can operate indefinitely without an energy source. This is theoretically possible due to the laws of thermodynamics.
How does a lever engine work?
A lever engine works by using levers to amplify an input force, potentially generating a greater output force. This mechanical advantage could potentially lead to the generation of free energy.
What is free energy?
Free energy, also known as zero-point energy, is a form of energy that is present in all space and can theoretically be harnessed to produce power.
Can I build a self-running machine at home?
Yes, it is possible to build a self-running machine at home. However, it is a complex task that requires a deep understanding of mechanical principles and the right materials.
Is free energy generation possible?
The concept of free energy generation is theoretically possible according to the laws of physics. However, it is a complex and controversial subject that is still being explored by scientists.
Welcome to inerter110.blogspot.com! Today, we delve into the fascinating realm of spring free energy. While numerous YouTubers have explored this topic, we're here to discuss a self-sustaining free energy generator powered by five springs made by Multi Electro.
Here are the key components utilized in crafting this innovative generator:
1. Five springs (adjustable based on project requirements)
2. Flywheel
3. Crankshaft
4. Sturdy frame constructed from iron angles
What sets this project apart is its reliance on the force of springs. Careful design ensures that these springs, strategically positioned, initiate and sustain the generator's operation indefinitely, barring component failure or intentional cessation. Unlike conventional engines fueled by external sources, our design harnesses the inherent energy of springs, hence earning the moniker "spring free energy."
But can this concept be scaled up? Absolutely. However, scalability introduces considerations such as increased noise levels and heightened risk of component failure, particularly with the springs.
Central to our design is a crankshaft engineered to perpetually engage three downward-pulling springs, balanced by two upward-pulling springs, thus maintaining optimal operational speed. In essence, it operates akin to an engine, yet distinctively draws its power from springs, epitomizing the concept of free energy generation.
In conclusion, the spring free energy generator embodies innovation at its core, offering a sustainable alternative to traditional energy sources.
How to Make a 220 Volt Electricity Generator with a 12 Volt Car Battery Charger at Home
Introduction
Harnessing the power of electricity at home is a fascinating endeavor. One of the most intriguing projects you can undertake is creating a 220-volt electricity generator using a 12-volt car battery charger. This guide will walk you through the process, providing you with a comprehensive understanding of the steps involved.
Understanding the Basics
What is a 220 Volt Electricity Generator?
A 220-volt electricity generator is a device that converts mechanical energy into electrical energy. This electrical energy is then used to power various appliances and devices in your home.
The Role of a 12 Volt Car Battery Charger
A 12-volt car battery charger is a device that provides the necessary power to charge a car battery. In this project, we will be using it as a power source to create our 220-volt electricity generator.
Gathering the Necessary Materials
Before we begin, it's essential to gather all the necessary materials. These include:
A 12-volt car battery charger
An inverter
A car battery
Wires and connectors
A multimeter
Step-by-Step Guide to Building Your 220 Volt Electricity Generator
Step 1: Setting Up the Battery Charger
The first step involves setting up the 12-volt car battery charger. Connect it to the car battery, ensuring that the positive and negative terminals are correctly connected.
Step 2: Connecting the Inverter
Next, connect the inverter to the car battery. The inverter is a crucial component as it converts the 12-volt DC power from the battery into 220-volt AC power.
Step 3: Testing the Setup
Once everything is connected, it's time to test the setup. Use a multimeter to measure the output voltage. If everything is set up correctly, it should read around 220 volts.
Safety Precautions When Building Your 220 Volt Electricity Generator
While this project is exciting, it's essential to prioritize safety. Always wear protective gear, and ensure that all connections are secure before testing the setup.
Troubleshooting Common Issues
If you're not getting the desired output, there could be several reasons. Check the connections, ensure the battery is fully charged, and verify that the inverter is functioning correctly.
Conclusion
Building a 220-volt electricity generator with a 12-volt car battery charger at home is a rewarding project. Not only does it provide a practical solution for power needs, but it also offers a great learning experience. With the right materials and a bit of patience, you can successfully create your own electricity generator.
FAQs
Can I use any 12-volt car battery charger for this project?
Yes, any 12-volt car battery charger should work for this project.
What type of inverter should I use?
A pure sine wave inverter is recommended for this project as it provides a clean and stable power output.
Can I use this generator to power all my home appliances?
The capacity of the generator depends on the power rating of the inverter and the battery. It may not be able to power all appliances simultaneously.
Is it safe to build a 220-volt electricity generator at home?
Yes, it is safe as long as you follow all safety precautions and guidelines.
What should I do if the output voltage is not 220 volts?
Check all connections, ensure the battery is fully charged, and verify that the inverter is functioning correctly. If the problem persists, consult a professional.
Building a 220V Free Energy Generator with Speaker Magnets, Rotor, and Stator
Introduction to Free Energy Generators
In the quest for sustainable and renewable energy sources, free energy generators have emerged as a promising solution. These devices, which harness energy from the environment, are gaining popularity due to their potential to reduce reliance on traditional power sources. One such device is a 220V free energy generator built using speaker magnets, a rotor, and a stator. This article provides a comprehensive guide on how to construct this generator.
Understanding the Concept of Free Energy Generators
Before delving into the construction process, it's crucial to understand what free energy generators are. These devices convert energy from the environment into usable electrical power. They operate on the principle of perpetual motion, which means they can run indefinitely without an external power source.
The Role of Speaker Magnets in Free Energy Generators
Speaker magnets play a pivotal role in the functioning of a free energy generator. They create a magnetic field that interacts with the rotor and stator to generate electricity. The stronger the magnets, the more power the generator can produce.
The Importance of the Rotor and Stator
The rotor and stator are integral components of a free energy generator. The rotor, which rotates within the magnetic field, interacts with the stator to produce electrical energy. The stator, on the other hand, remains stationary and houses the magnetic field.
Step-by-Step Guide to Building a 220V Free Energy Generator
Step 1: Gathering the Materials
The first step in building a 220V free energy generator is gathering the necessary materials. These include speaker magnets, a rotor, a stator, copper wire, and a multimeter.
Step 2: Assembling the Rotor and Stator
The next step involves assembling the rotor and stator.
The rotor should be placed within the stator, ensuring that it can rotate freely.
Step 3: Installing the Speaker Magnets
The speaker magnets should be installed on the stator. They should be arranged in a way that maximizes the magnetic field.
Step 4: Wiring the Generator
The generator should be wired using copper wire. The wire should be connected to the rotor and stator, creating a circuit that allows electricity to flow.
Step 5: Testing the Generator
The final step is testing the generator using a multimeter. If the generator is functioning correctly, it should produce a voltage of 220V.
Safety Precautions When Building a Free Energy Generator
When building a free energy generator, safety should be a top priority. Always wear protective gear, such as gloves and safety glasses, and work in a well-ventilated area. Additionally, ensure that the generator is properly grounded to prevent electrical shocks.
Conclusion
Building a 220V free energy generator with speaker magnets, a rotor, and a stator is a feasible project that can contribute to sustainable energy solutions. By following the steps outlined in this guide, you can construct a generator that harnesses free energy from the environment. Remember to prioritize safety during the construction process and regularly maintain your generator to ensure its longevity.
FAQs
What is a free energy generator?
A free energy generator is a device that converts energy from the environment into usable electrical power.
What role do speaker magnets play in a free energy generator?
Speaker magnets create a magnetic field that interacts with the rotor and stator to generate electricity.
What are the rotor and stator in a free energy generator?
The rotor rotates within the magnetic field and interacts with the stator to produce electrical energy. The stator remains stationary and houses the magnetic field.
What safety precautions should I take when building a free energy generator?
Always wear protective gear, work in a well-ventilated area, and ensure that the generator is properly grounded.
How can I test if my free energy generator is working?
You can test the generator using a multimeter. If it's functioning correctly, it should produce a voltage of 220V.